Tag Archives: How

How to User Block on Instagram

Blocking people is one of the most useful Instagram privacy features. Keeping someone out of your profile for whatever reason is pretty easy to do. Better yet, there are a few ways to do it:

Block Someone on Instagram

  1. Tap the username of who you want to block.
  2. Tap the settings button
  3. Choose “Block.”

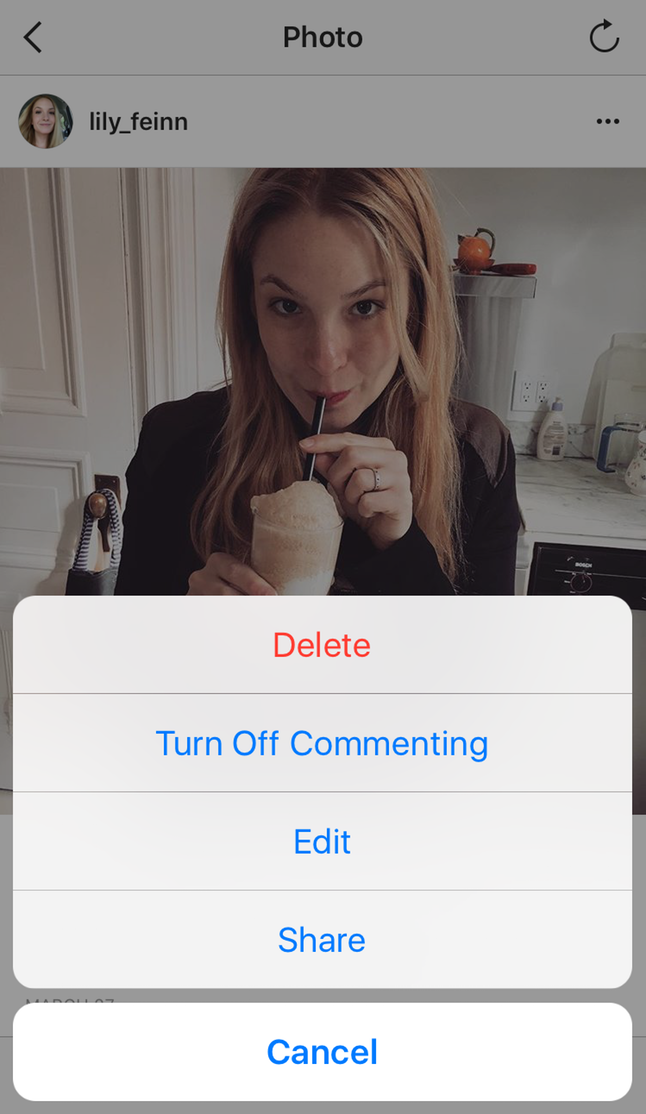
If you don’t want to completely block someone, you can also just keep them from commenting on your photos:

Block Photo Comments:
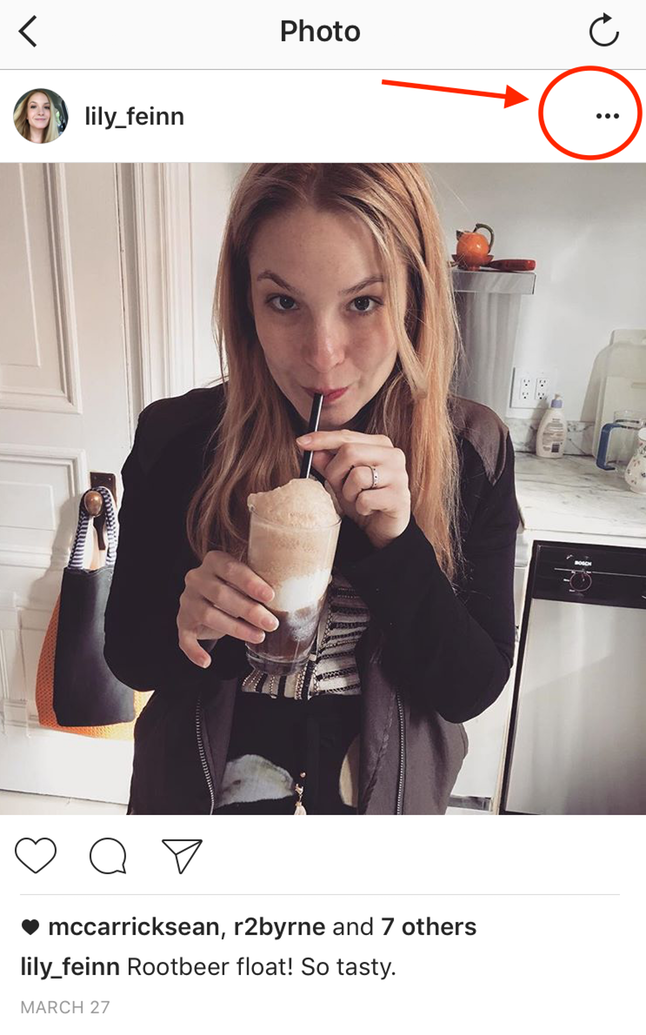
  1. Open your profile
  2. Tap on the settings button.
  3. Tap “Comment Controls”
  4. You should see a “People” option next to “Block Comments From.”
  5. Enter the name of the person you want to block and select “Block.”

If you want to go even further and report someone for a message or comment, do the following:

Report a Comment/Message

  1. Open the conversation
  2. Tap the message/comment in question
  3. Tap the “Report” option.

How to Hide Location on Instagram

One of the primary functions of Instagram is the ability to easily tag photos. These tags can identify friends, make sharing pictures easier, and, of course, identify locations. Obviously, you need to make sure that Instagram is able to find your location for that last feature to work. That means enabling location sharing on your iPhone.

As you might know, location sharing can be a major security concern. While the extent of your vulnerability is up for debate, there are times when you just don’t want to run the risk. If you’re experiencing one of those times, then here’s how you disable your location on Instagram.

  1. Open your iPhone (or device) settings.
  2. Navigate to “Privacy” and choose “Location Services.”
  3. Tap on the Instagram app.
  4. Choose either “Never” or “While Using Your App” based on your preference.

Again, this will remove some Instagram features, so make sure you know what you’re missing out on.

How to Hide Profiles From Search on Instagram

When it comes to hiding/removing search history, Instagram is pretty generous. Perhaps realizing that people would want to keep their history clean, they loaded the app with plenty of options.

One of those options lets you hide specific profiles from your search. This feature has a few uses. For instance, you might not want people to know you are clearing your history. This function also lets you permanently hide a profile. That means that it will never appear in your search history. That makes it so you don’t have to constantly clear your history.

If you want to hide a profile from your searches, just follow these steps:

  1. Tap the search option at the top of your app.
  2. Tap “Top” or “People”
  3. Find the profile you want to hide and hold your finger on it.
  4. Tap the hide option.

This should forever hide the profile in question from your searches.

How to Delete Search History

Let’s be honest. From time to time, everyone searches for a profile they don’t want others to know about. We’re not going to pry into your business…we just know it happens. Whether it’s sexy picture or the ex you can’t get over, everyone has that Instagram profile they’re ashamed of. Still, a lot of people are awful when it comes to clearing their profile. What’s strange about that is that clearing your search history couldn’t be easier to do. Just follow these steps:

  1. Open your Instagram settings.
  2. Scroll down to “Clear Search History.”
  3. Confirm the deletion on the screen that appears.

That should clear out your Instagram search history. We say “should” because there are times when a profile will still pop up in your search history even after you’ve cleared it. For those times, you’ll need to check out the next entry…

How to Make Your Pictures Private on Instagram

By default, all your photos and videos are public on Instagram. Instead of blocking potential clients on Instagram to prevent them from viewing your personal photos, you can change the visibility settings of your profile. Once you make the change, only approved followers can see your private photos and videos. Furthermore, people who want to view your photos must send you a follow request; you can allow or deny that request. Follow requests are displayed in the News Feed section of your profile.

Change Instagram Visibility to Private

Navigate to your Instagram profile by tapping the “Profile” icon after you log in to your Instagram account. Tap “Edit Your Profile” to enter profile editing mode. The “Edit Your Profile” option is located next to your profile picture. On iOS devices, toggle the “Posts Are Private” switch to the “On” position. If you are using a Windows or Android smartphone, check the “Posts are Private” box. The new settings are applied immediately.

How to Change an Instagram Profile From Private to Public

Instagram profiles can be viewed on the Instagram app for mobile devices and on the Web, but what others see depends on the setting for your photos, not an overall profile setting. If your posts are public, anyone can see your profile. However, if your posts are set to private, only logged-in users that you have previously approved can see your content. Change your photo setting to adjust who can see your profile and its content.

Picking Public

Instagram permits anyone to see your profile and photos by default. If your profile is set to private, you have previously set your photos to private. To adjust this, start your Instagram app on your mobile device, go to your profile and tap “Edit Your Profile.” IOS users, scroll to the bottom of the screen and toggle the “Posts Are Private” switch to the Off position. If you have a Windows Phone or Android device, uncheck the box labeled “Posts are Private.” Click “Done” to set your photos to public and make your profile public as well.

How To Turn Off Comments For A Post On Instagram

1. Update Your App

Before attempting to alter your comment settings, head over to the ol’ app store to make sure you are using the latest version of ‘gram. The new comment control features are rolling out Monday, Dec. 6, so once you update, you can finally let your images stand alone.

2. Open “Advanced Settings”

In order to turn off commenting before you post an image, simply tap on the “advanced settings” option at the bottom of your screen.

3. Select “Turn Off Commenting”

Toggle on the switch and commenting will be disabled for the new post. If you change your mind, don’t sweat it! This feature is quite flexible and commenting can be turned back on at any time!

Turning Off Commenting For An Existing Post:

1. Select The “…” Menu On The Post

Say you have a post that has been getting a lot of attention, but not the kind you want. In the past, you may have been temped to delete your personal post or change your account to private — but now there’s a better option! In order to retroactively turn off commenting for a public post, open your Instagram profile, select the post you want to alter, and tap on the “…” icon in the upper right hand corner of the screen.

2. Tap “Turn Off Commenting”

To disable commenting, tap the “Turn Off Commenting” option. The little speech bubble icon that is typically seen between the “heart” and the “sharing” icons will disappear. It’s a fairly subtle change so most viewers won’t even realize that comments are disabled on the post until they try to write something. Ah, silence!

How to Edit and Delete Comments on Instagram

Nobody likes a dumb typo, but thankfully, you can correct those mistakes if you make them on Instagram. It’s a feature that’s been around for a while, but it’s a bit buried and you might not have noticed it.

To delete a comment on your own post or someone else’s, tap the comment button, then swipe left on your comment. You can then hit the trash can symbol to delete your comment.

As for editing, you can edit your comment on your own posts. Just tap the three dots icon on your post, then tap Edit. You can fix those typos, add a location, or tag people.

How to change Instagram Username?

Whether you regret your teenage-fueled weird Instagram username or your cool startup pivoted and changed its name completely (warranting a new Instagram username of course – that’s until your next pivot comes along) then here are a few super simple steps to change your Instagram Username, the one which people partly use to find you and the one which they need to use to tag you in.

Here are the steps (identical for phones and web browsers)

  1. Go to Instagram’s main page or to the application, click on your profile (bottom right corner in the app and in the top right on the web).
  2. After clicking here, click further on “Edit Profile” which will be next to your display picture. If you scroll down a bit the page will look like this. The top part should start with “Edit Profile” and this is the tab you need to be in.
  3. Here you can change your display picture, name, username and so on! Whatever your heart desires to change about your account is now there – unless someone else has the same username, then you can’t really do much unless you really really want it.  We’ll show you how to do that in another post.

Here is a visual guide that you can follow along with the written description above.

The edit profile option will take you to a page where you can modify most of your displayed personal information. Click on the username to change it.

You are now in the section where you can edit your username. If you choose a username that is already taken, the app will say it is unavailable. Eventually, when there is a unique username that you can pick, it will not display any messages. You can now verify it with the checkmark button above.