Author Archives: admin1

How to Change an Instagram Profile From Private to Public

Instagram profiles can be viewed on the Instagram app for mobile devices and on the Web, but what others see depends on the setting for your photos, not an overall profile setting. If your posts are public, anyone can see your profile. However, if your posts are set to private, only logged-in users that you have previously approved can see your content. Change your photo setting to adjust who can see your profile and its content.

Picking Public

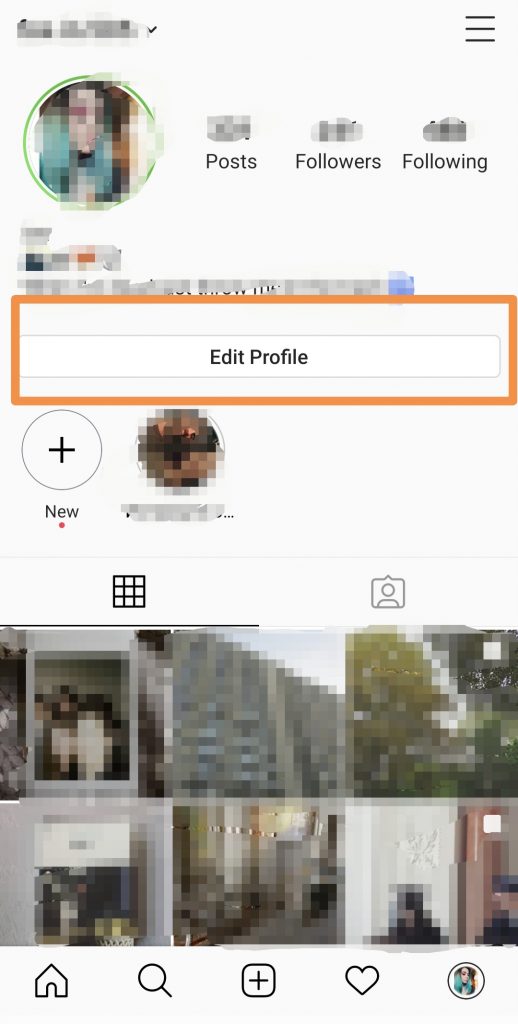
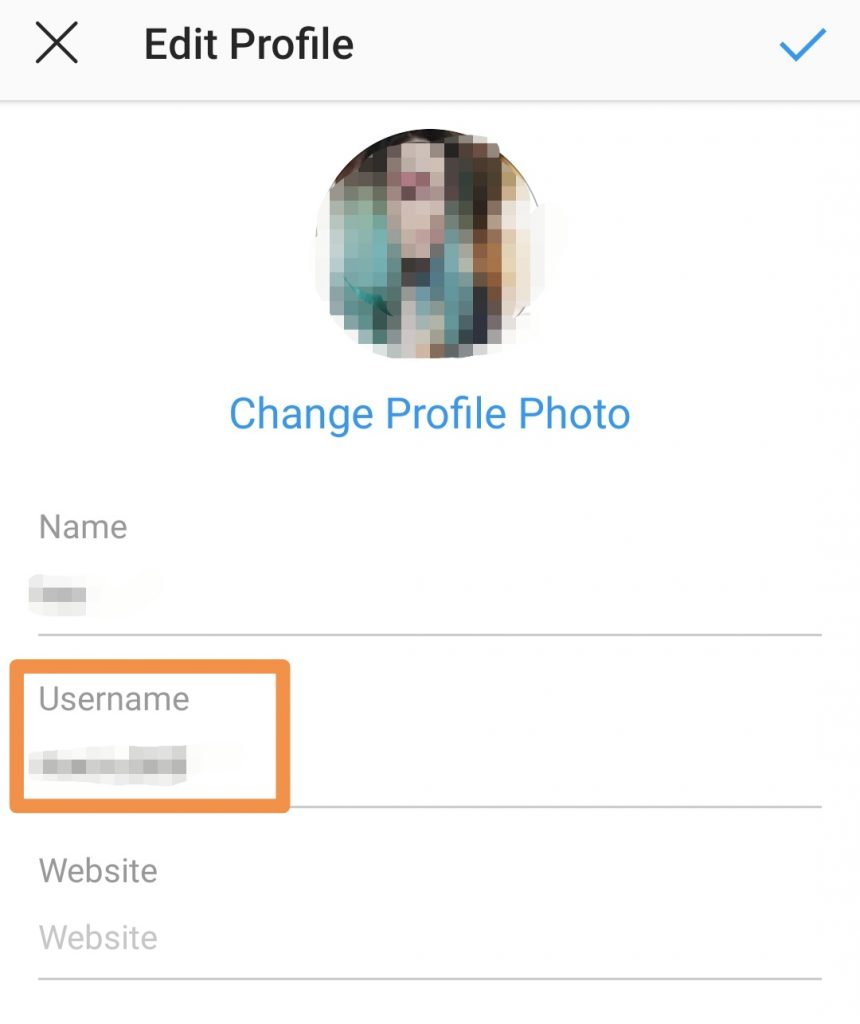
Instagram permits anyone to see your profile and photos by default. If your profile is set to private, you have previously set your photos to private. To adjust this, start your Instagram app on your mobile device, go to your profile and tap “Edit Your Profile.” IOS users, scroll to the bottom of the screen and toggle the “Posts Are Private” switch to the Off position. If you have a Windows Phone or Android device, uncheck the box labeled “Posts are Private.” Click “Done” to set your photos to public and make your profile public as well.

What is the use of Hashtag in Instagram?

If you include the right Instagram hashtags on your posts, you will likely see higher engagement than you would if you didn’t have any.

Why?

Because hashtags—a combination of letters, numbers, and emoji preceded by the # symbol (e.g. #NoFilter, #WorldCup)—categorize content and make it more discoverable. Anyone who clicks on a hashtag or searches for it will see a page with all the posts tagged with it.

World Cup instagram hashtag page

How high up on a hashtag page your post appears depends on:

  • How often it’s used
  • How popular your post is (does it already have a lot of likes and comments?)
  • When you shared it (you find many old posts on hashtag searches)
  • The strength of your audience (ie. do you have a large, engaged audience?)

The higher your post appears, the better, as it will be more discoverable by people who don’t already follow you.

How To Turn Off Comments For A Post On Instagram

1. Update Your App

Before attempting to alter your comment settings, head over to the ol’ app store to make sure you are using the latest version of ‘gram. The new comment control features are rolling out Monday, Dec. 6, so once you update, you can finally let your images stand alone.

2. Open “Advanced Settings”

In order to turn off commenting before you post an image, simply tap on the “advanced settings” option at the bottom of your screen.

3. Select “Turn Off Commenting”

Toggle on the switch and commenting will be disabled for the new post. If you change your mind, don’t sweat it! This feature is quite flexible and commenting can be turned back on at any time!

Turning Off Commenting For An Existing Post:

1. Select The “…” Menu On The Post

Say you have a post that has been getting a lot of attention, but not the kind you want. In the past, you may have been temped to delete your personal post or change your account to private — but now there’s a better option! In order to retroactively turn off commenting for a public post, open your Instagram profile, select the post you want to alter, and tap on the “…” icon in the upper right hand corner of the screen.

2. Tap “Turn Off Commenting”

To disable commenting, tap the “Turn Off Commenting” option. The little speech bubble icon that is typically seen between the “heart” and the “sharing” icons will disappear. It’s a fairly subtle change so most viewers won’t even realize that comments are disabled on the post until they try to write something. Ah, silence!

How to Edit and Delete Comments on Instagram

Nobody likes a dumb typo, but thankfully, you can correct those mistakes if you make them on Instagram. It’s a feature that’s been around for a while, but it’s a bit buried and you might not have noticed it.

To delete a comment on your own post or someone else’s, tap the comment button, then swipe left on your comment. You can then hit the trash can symbol to delete your comment.

As for editing, you can edit your comment on your own posts. Just tap the three dots icon on your post, then tap Edit. You can fix those typos, add a location, or tag people.

How to change Instagram Username?

Whether you regret your teenage-fueled weird Instagram username or your cool startup pivoted and changed its name completely (warranting a new Instagram username of course – that’s until your next pivot comes along) then here are a few super simple steps to change your Instagram Username, the one which people partly use to find you and the one which they need to use to tag you in.

Here are the steps (identical for phones and web browsers)

  1. Go to Instagram’s main page or to the application, click on your profile (bottom right corner in the app and in the top right on the web).
  2. After clicking here, click further on “Edit Profile” which will be next to your display picture. If you scroll down a bit the page will look like this. The top part should start with “Edit Profile” and this is the tab you need to be in.
  3. Here you can change your display picture, name, username and so on! Whatever your heart desires to change about your account is now there – unless someone else has the same username, then you can’t really do much unless you really really want it.  We’ll show you how to do that in another post.

Here is a visual guide that you can follow along with the written description above.

The edit profile option will take you to a page where you can modify most of your displayed personal information. Click on the username to change it.

You are now in the section where you can edit your username. If you choose a username that is already taken, the app will say it is unavailable. Eventually, when there is a unique username that you can pick, it will not display any messages. You can now verify it with the checkmark button above.

How to edit Instagram bio?

  1. Open your profile, and click the “Edit Profile” button
  2. Click on your bio to edit
  3. Update your bio by adding any profile usernames (using “@”) or hashtags (using “#”)
  4. Click “Done”

It’s as easy as that! Now your username mentions and hashtags will be clickable links within your Instagram bio.

Generally speaking, it’s a great thing to have your username linked on someone else’s bio, because it adds more visibility to your account and allows their followers to discover you. This is simply a security measure to keep accounts from abusing the new feature.

How to Add a Link to Your Instagram Bio

  1. Open your Instagram mobile app.
  2. Visit your profile by tapping the person icon on the bottom right.
  3. Tap “Edit Profile” at the top of the screen.
  4. Write a custom description in 150 characters or less.
  5. Add a brief link to your website in the form of yourdomain.com.
  6. Add links to other profiles by tapping “@” followed by the profile’s handle.
  7. Add hashtags by tapping “#” followed by the hashtag you associate with.
  8. Tap “Done” to save your bio.

How to Create a Location on Instagram

Instagram used to allow you to create a custom location, but it has since changed. Custom locations can no longer be created directly on Instagram, rather they must be created through Facebook.

It is unlikely that you will need to create a location on Instagram, as most of the data on the app is taken from Google and Facebook. Most users will not run into this issue if they already have a Facebook business page or a Google My Business page. However, if you need to create a location on Instagram, you must first log onto Facebook to create a location on Facebook and that location will show up on your Instagram account.

How to Search Instagram by Location

One of the benefits of adding or tagging a location on Instagram is that users can search Instagram by location. This is commonly done when a user is looking for a restaurant or event to attend or when they stumble upon a picture taken at a location and want to see more.  When using Instagram for your business, always add the location of your business so that your pictures will come up in a location search.

To search a location on Instagram from the search icon:

  1. Tap the Search icon.
  2. Tap Search.
  3. Tap Places.
  4. Enter location name (this is usually the name of the business).

To search a location on Instagram from a photo:

  1. Tap the Location.
  2. All of the photos tagged at the location will come up.
  3. Search through the pictures.

In addition to using the Instagram app to search locations, you can always search locations on websites or apps like Gramfeed that allow you to search locations based on a map or address.

Why Tagging Your Location is Important

Every small business owner wants to put their business on the map to get found by more customers. Getting your small business on Instagram and immediately adding your business’s location is a great way to get your business in front of people who are active on the social media site—not just any people, but people who are most likely to become customers.

Instagram users add and search locations for a variety of different reasons. Whether they’re daydreaming about a vacation, looking to learn more about a city, or searching for tasty dishes at your restaurant, locations on Instagram give users the ability to tell their followers where they are. Here’s a quick rundown on how to tag a location on Instagram, how to search for a location on Instagram, and how to hashtag a location on Instagram.