Author Archives: admin1

How to Use Instagram Live Format

We’re separating Live from the Format pack because it’s the most complicated of the options.

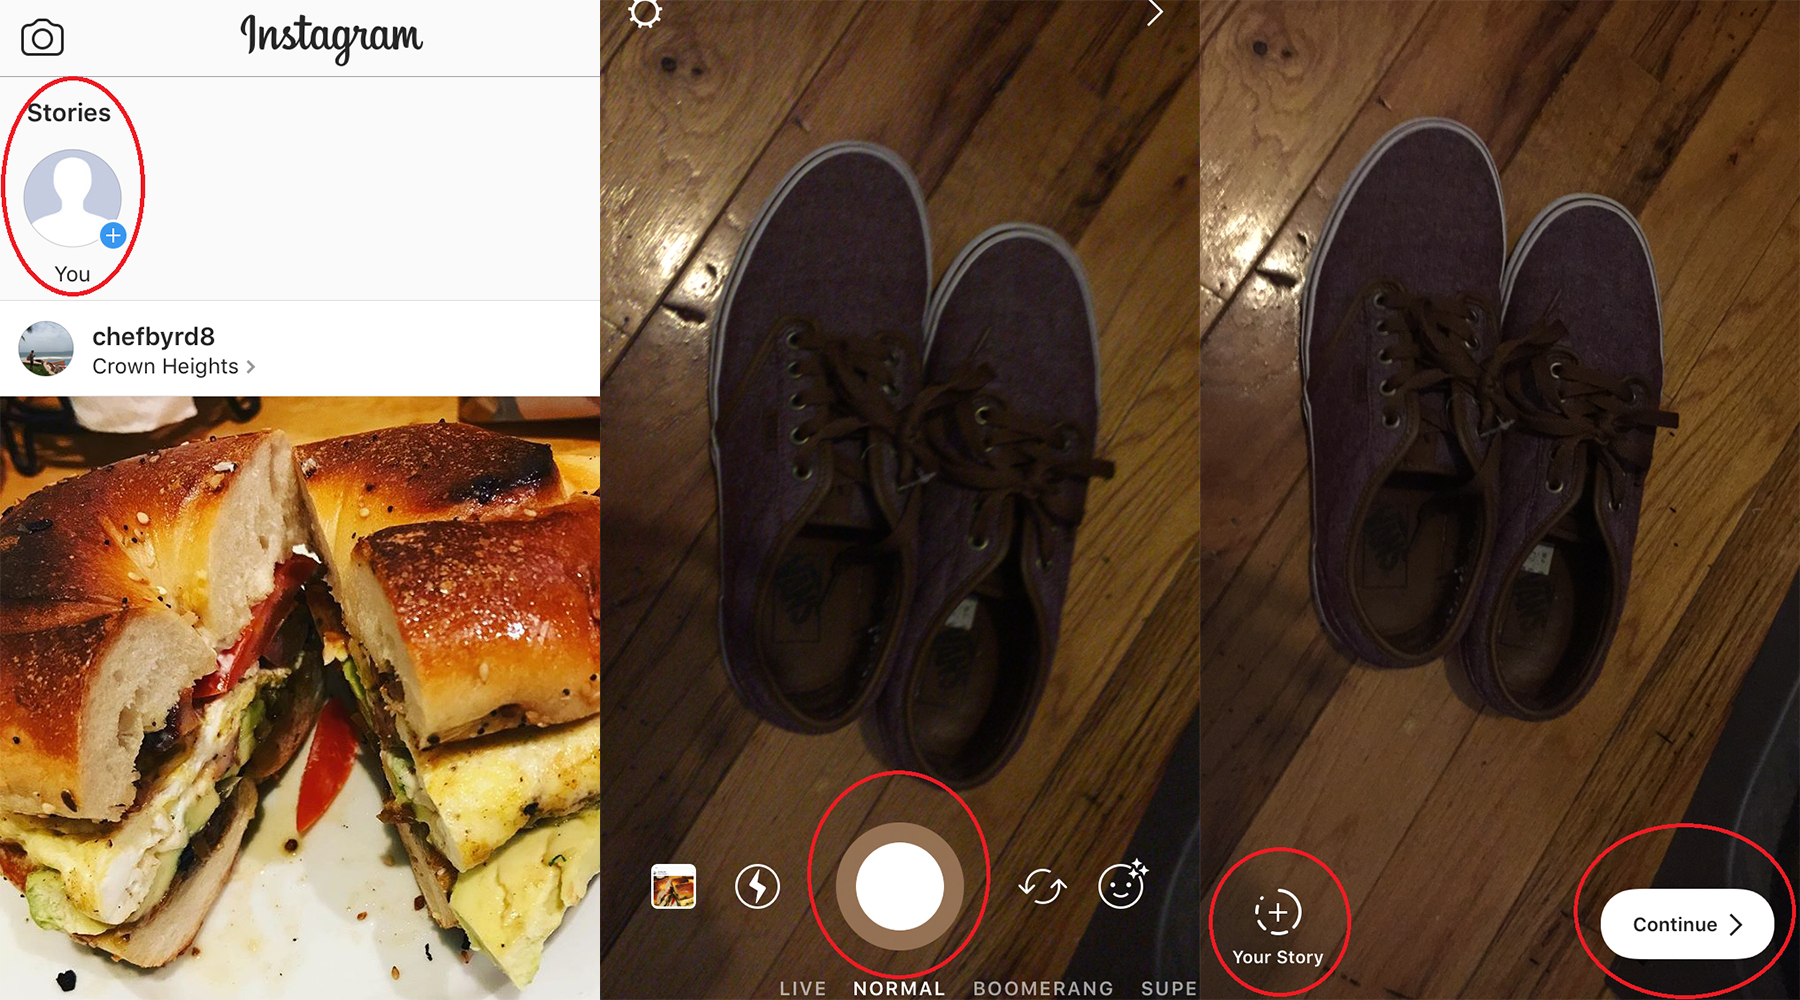
Basically, Live allows you to live stream content and send it out to your followers. It’s incredibly easy to use. Just choose live, press the capture button, and you’re set. Just be sure to let people know when you’re streaming.

Not too long ago, Instagram added the ability to save your Live videos as a story. At the end of your broadcast, you’ll see a “Share” option appear on-screen. Simply choose that option and your video will be added to Stories for the usual 24 hour period.

If you want to save the stream footage permanently, you’re going to have to choose to add it to your Instagram feed. To do so, just choose the “Save” option that appears on the top right of the screen at the end of your video.

What Are Formats of Instagram stories?

Instagram Stoies formats allow you to dictate the kind of content you’ll be sending out to the world. Here are your options:

Normal: Just as it sounds, this is a normal photo or video. They’re just like the ones you would post to your regular Instagram account. You tap the capture button to take a photo or hold it down for up to 15 seconds for a video. The only difference is that Story photos and videos will disappear after a day.

Rewind: Rewind is a normal video that plays backward. This is used entirely for stylistic purposes.

Hands-Free: This handy format allows you to record a video without holding down the capture button. Simply choose Hands-Free, press the capture button once, and take your video. It will run the full 15 seconds unless you choose to manually stop it.

Boomerang: This is one of Instagram’s most exciting format. It allows you record a few seconds long moving GIF that will play forwards and backward until the user exits it. It’s a popular format that is well worth mastering.

How to View Other Instagram Stories

Instagram has assigned Stories a good bit of interface real estate. The stories of everyone you follow can be found at the top of your Instagram profile. Simply choose one and it will automatically start playing.

You can also see who has been viewing your stories. This information will be at the bottom of your Stories post. It will state something like “John Doe and x others.” You can tap on that information to see the full list of people that have viewed your story. You can even tap on the individual pieces of content to see the stats for every photo and video.

How to Create an Instagram Story

  1. Tap the plus sign on the top left corner of your Instagram profile
  2. Take a photo or add a video using the circle capture button. You’ll also need to choose a format, but we’ll cover that later.
  3. If you want to add any filters and effects to your photos on the next screen. Again, we’ll talk more about this later.
  4. Finally, tap “Continue” to share your story or press the Plus sign on the bottom left to add it to your story.

That’s pretty much it. You can add to your story using the exact same method for as long as it’s available. You can also add existing photos to your story using the “+ your story” button available via any existing content.

How to Share Nametag on Instagram

The good thing about Nametag is you can even share them via other apps or print them. So that other people can scan it and follow you.

Once you access your Nametag from the profile screen, you will find the Share button at the top-right corner of the same screen. Tap on it, and you will get the sharing options. Share it using an app from the share menu.

Instagram Nametag 15

How to Scan Nametag on Instagram

There are three ways to scan a Nametag in real-time.

Method 1: From the Story Screen

This is the easiest way to scan an Instagram Nametag. You need to go to the Story screen by swiping right on the home screen of the Instagram app. You can also tap on the Camera icon at the top-left corner.

Instagram Nametag 10

Once in the camera mode, point your camera towards the Nametag and long press on your screen. Instagram will scan the Nametag automatically and will recognize the user to give you two options — Follow or View profile. Select either of them.

Instagram Nametag 11

Method 2: From Search

Another option to scan is possible from the Search or Explore feed. When you open the Search tab, you will find a small scan icon on the right side of the Search bar. Tap on it, and you will see the scan screen. Again, point your camera towards the Nametag and hold the screen until your phone recognizes the profile.

Instagram Nametag 12

You can access your Nametag from the Search screen as well. When you are in the scan mode, you will find Go to your Nametag option at the bottom. Tap on it.

Instagram Nametag 13

Method 3: From Profile Screen

When you access your Nametag from the profile screen, you can also scan Nametags from the same screen.

To do so, tap on the Scan a Nametag option present at the bottom.

How to Customize Nametag on Instagram

Instagram offers three ways to customize your Nametag. You can change the background color, add emojis to the background, and create a selfie nametag with stickers.

Change Background Color

When you open your Nametag, Color is the default customization option. Tap anywhere on the screen to explore the palette.

Instagram Nametag 1
Instagram Nametag 2

Add Emojis

Tap on the Color option at the top to switch to the Emoji mode. Again, tap anywhere on the screen. Once you do that, the emoji drawer will open. You can select any emoji from it.

Instagram Nametag 4
Instagram Nametag 5

Selfie Background

If the two options don’t satisfy you, use the selfie background. To switch to it, tap on the Emoji button at the top. But if you see the Color button, tap it twice. Then tap on the sticker to change it and take a selfie. Once captured, your selfie thumbnails will be your Nametag’s background.

If you don’t like your current selfie Nametag, tap on the Retake option to start again.

Instagram Nametag 8
Instagram Nametag 9

Things to Remember:

  • You can select only one emoji at a time.
  • You cannot switch to the back camera in the Selfie mode.
  • You cannot combine these three modes and must use them individually.